
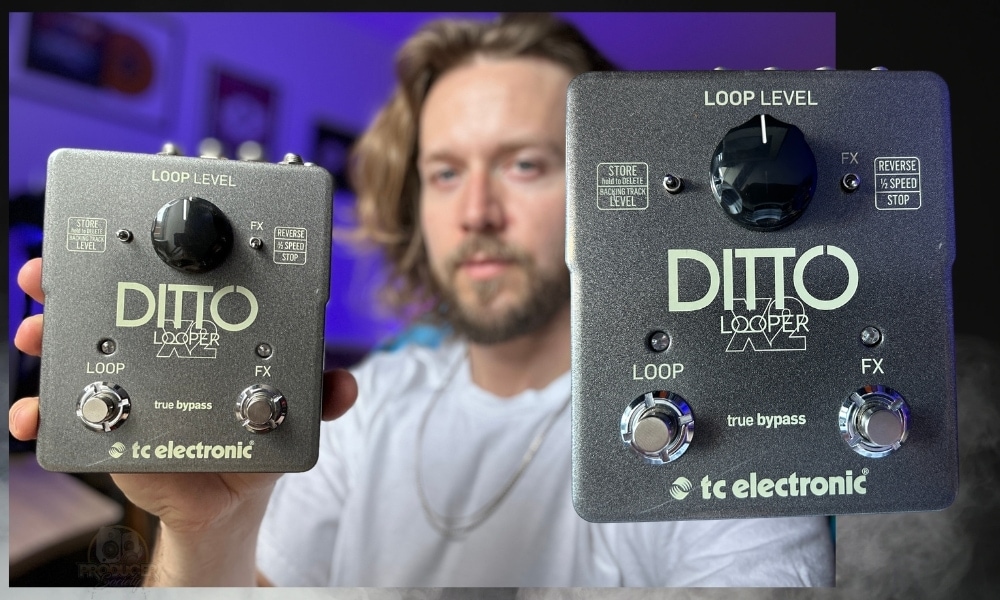
Unlike some looper pedals, the TC Electronic Ditto X2 is built for simplicity. I doubt you’ll break a sweat when using it because it’s not complicated. Let’s start with the basics first.
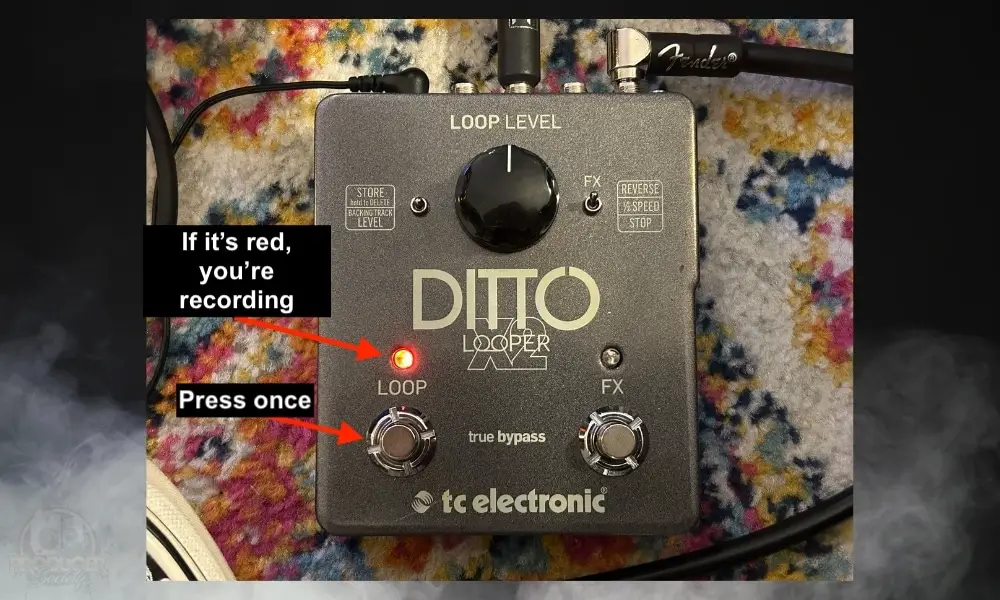
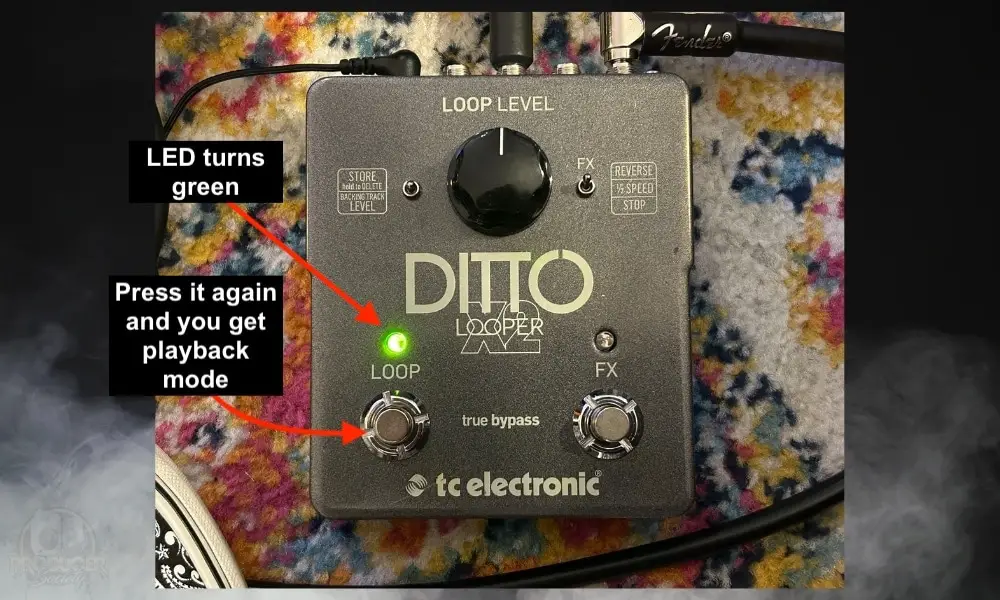
To use the Ditto X2, first, connect a 9VDC 100mA power adapter or two 9V batteries. Press the “LOOP” footswitch to play and record your loop. When the LED turns red, it’s in “Record Mode.” Press the footswitch again to begin playback and the LED will turn green.
Contents - Sidebar TOC ->
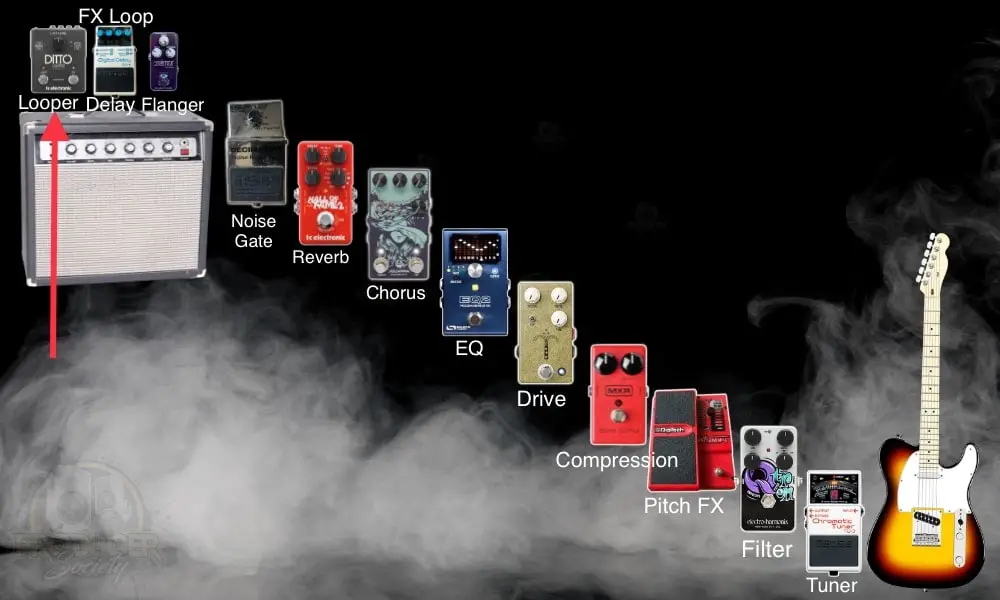
While the Ditto X2 manual says to put it at the end of your chain like we’ll talk about. in a second, I recommend putting it in your FX Loop with other time-based FX.
As I mentioned in my looper signal chain guide a while back, this gives you the freedom to turn effects on and off on your loop. So you’ve got total control over your looper’s functions and your pedal’s processing.
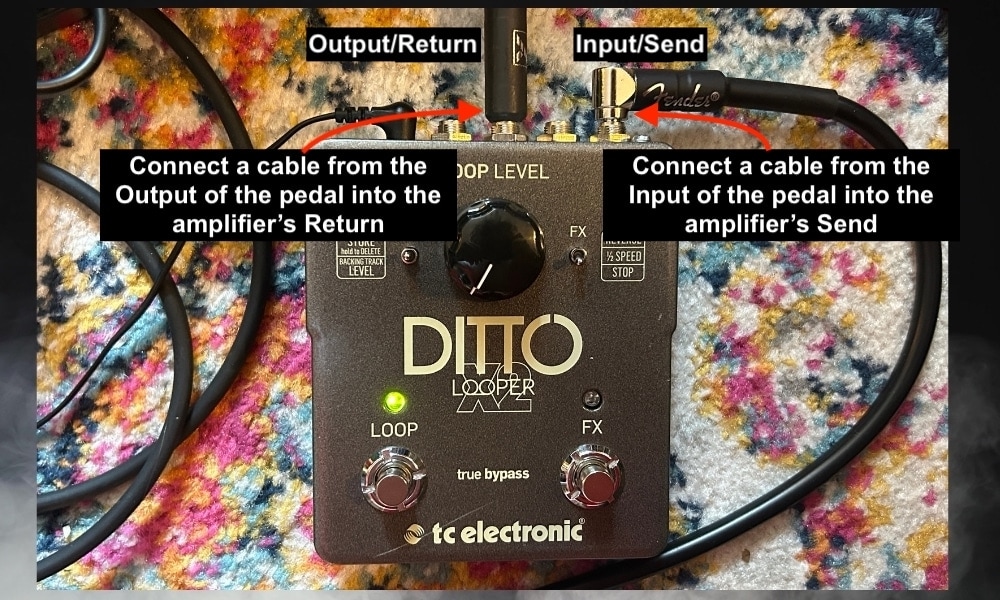
If you’ve got the looper in your FX Loop with other time-based effects, make it last in the chain, after delay and other FX like that.

There’s nothing wrong with putting it at the end of your chain, just before the amplifier though. It’ll work just as well if you don’t have an FX Loop.
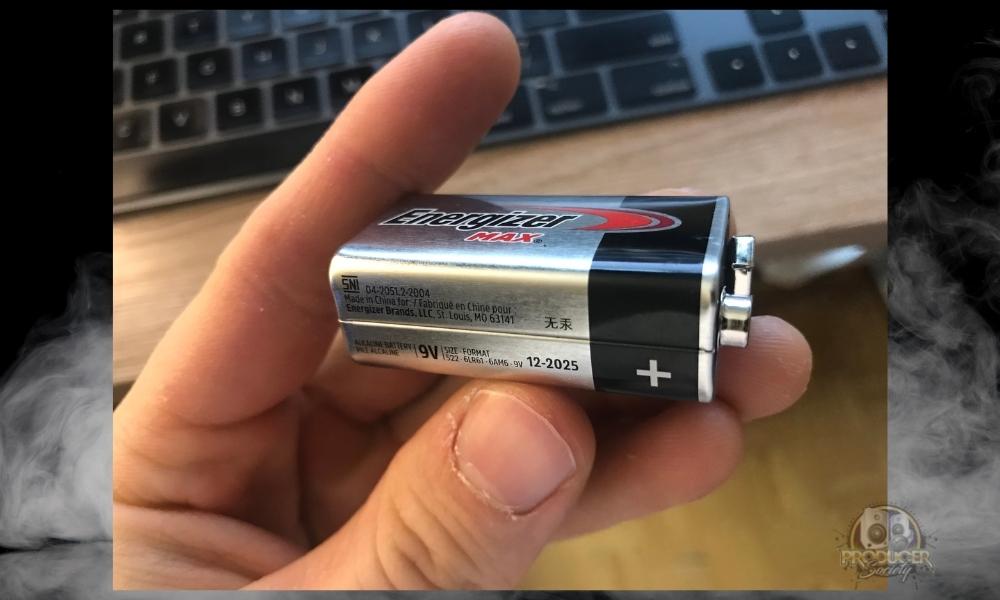
You can also power the pedal with one or two 9V batteries. The Ditto Looper X2 has two battery slots and can run on one or two cells for an extended period of time.

To the pedal’s power input connector, connect your own 9V DC power adapter with a minimum current rating of 100 mA. Please keep in mind that the power supply is not included. If you’ve got extra money to burn, the PPP3+ is definitely worth it.
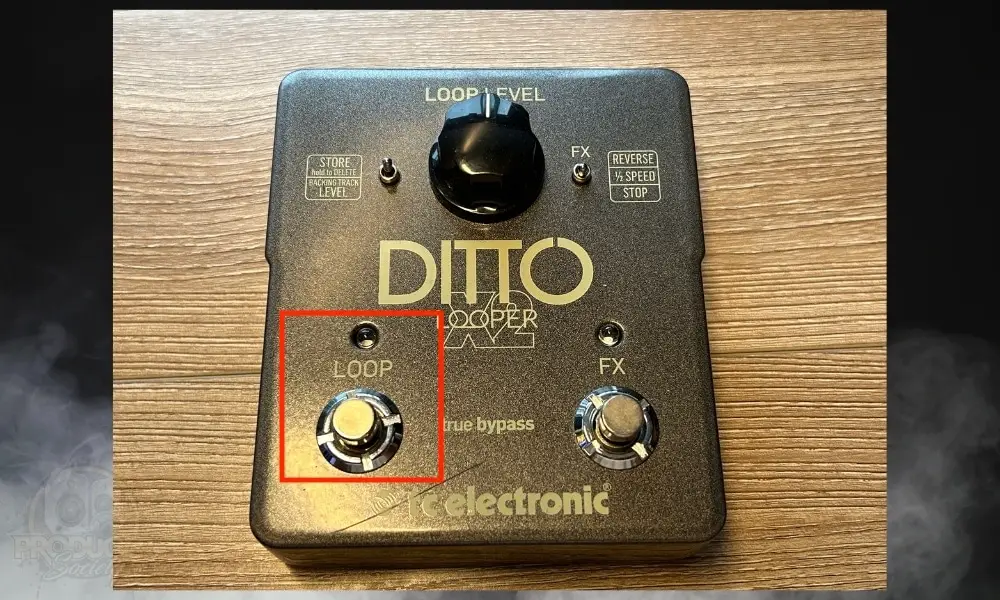
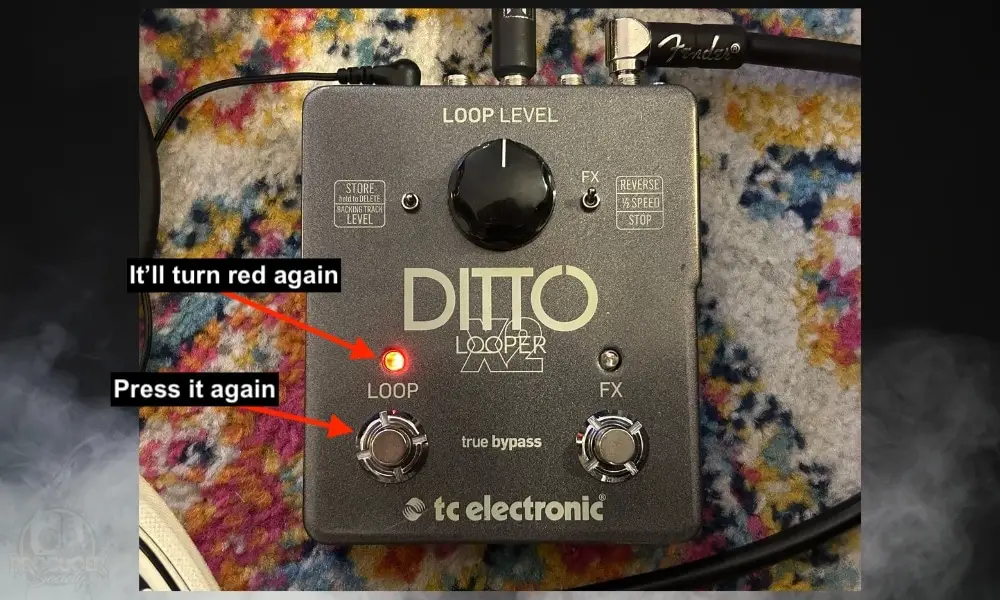
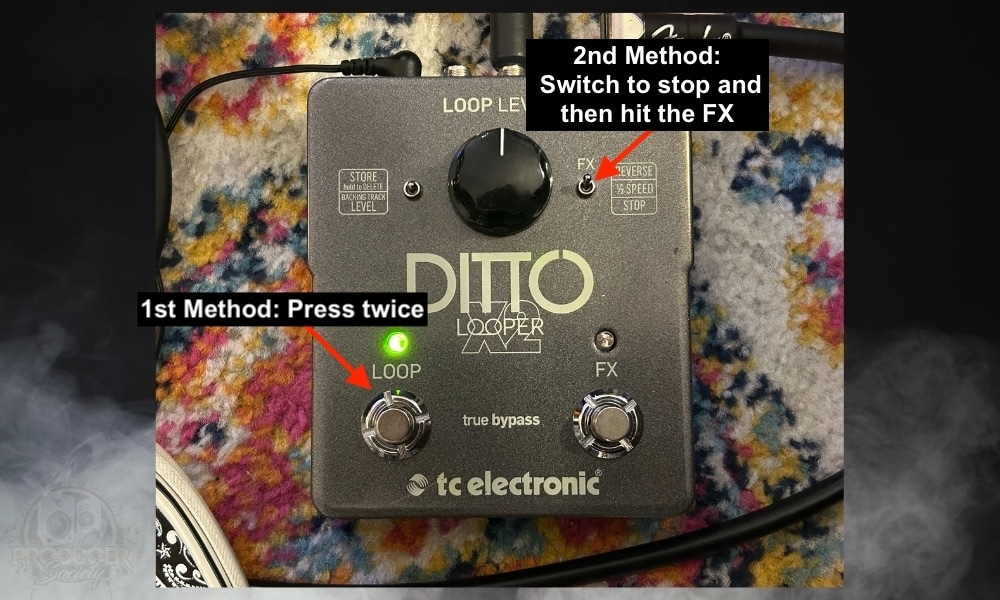
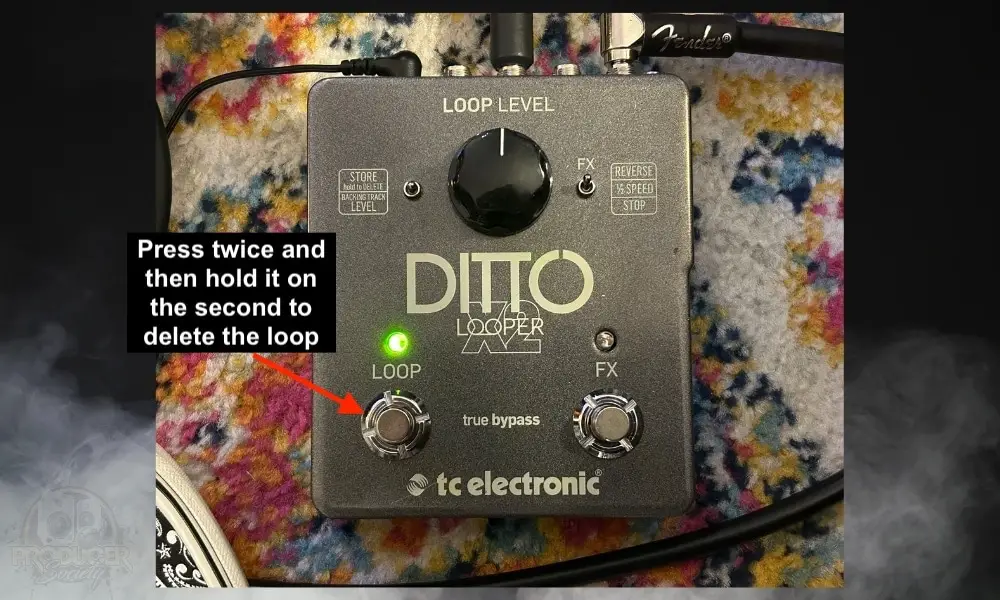
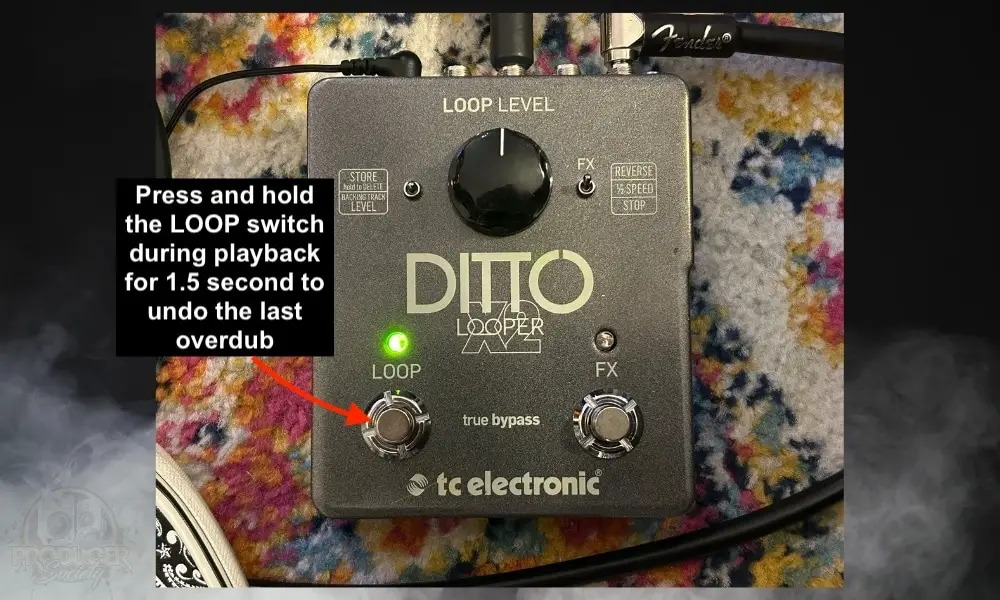
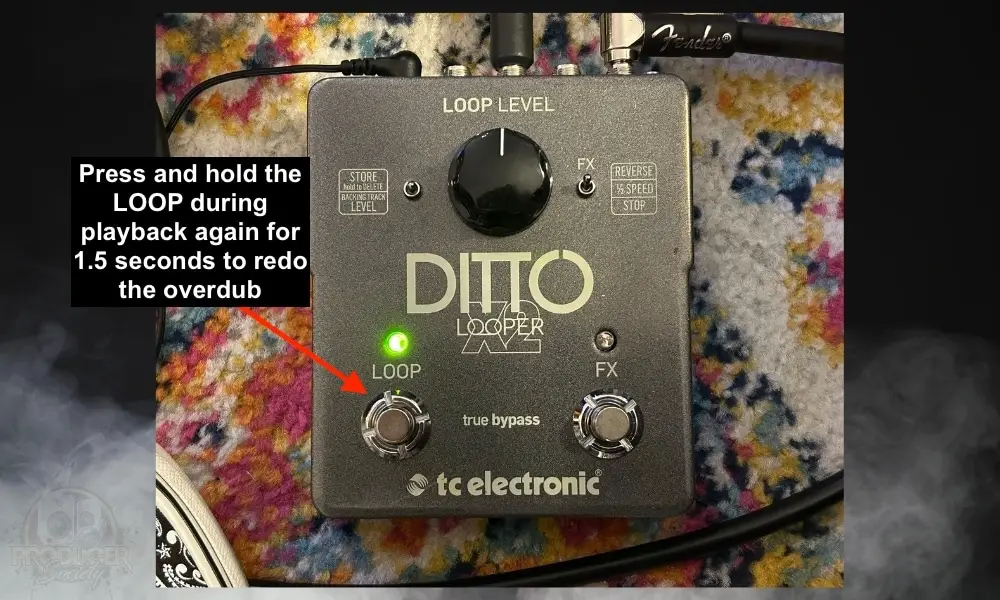
This controls basic recording, playback, deleting the loops, undoing and redoing, as well. as temporarily stopping it.
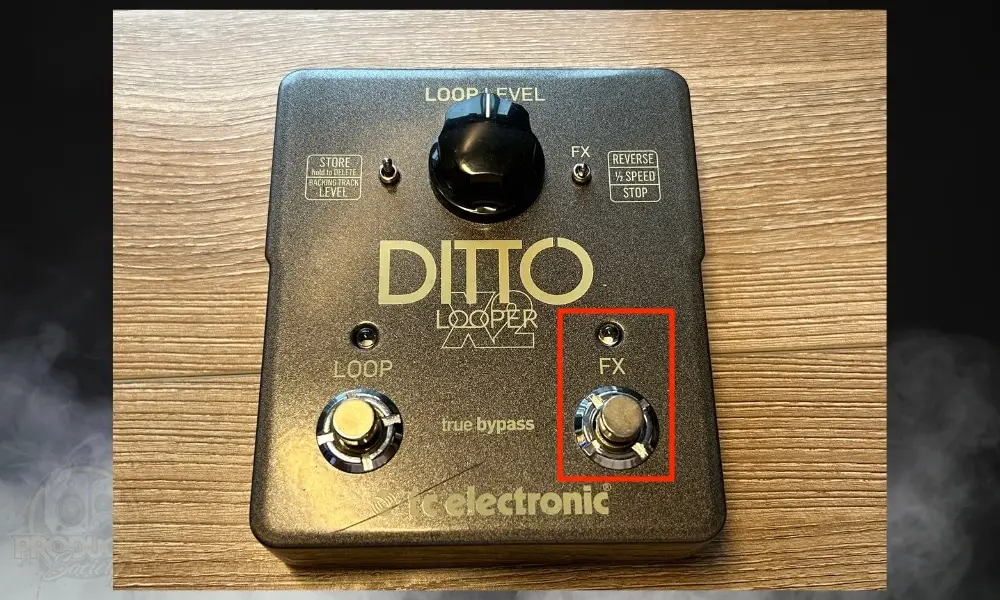
With the FX switch, you can control the Reverse, Half-Speed, and Stop function. You can also use it to toggle both at the same time.

One of the only downsides to the RC-5 is the lack of a conveniently placed volume knob. Thankfully, the Ditto X2 has that.
This one is pretty self-explanatory.
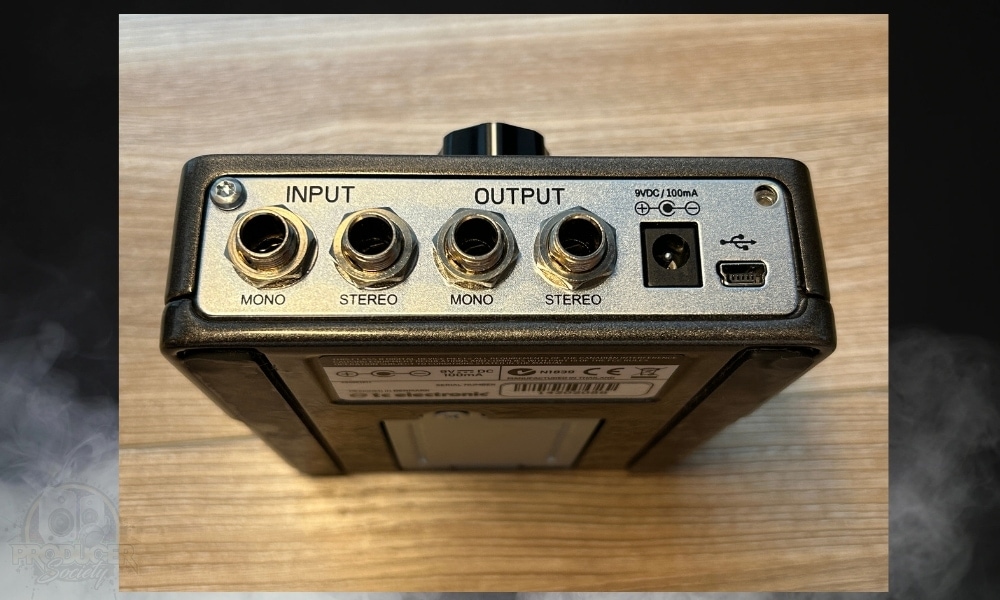
Connect your instrument using a regular 1/4″ instrument cable to the Ditto Looper X2 and plug it into the pedal’s MONO input port on the back. For stereo signals, use the pedal’s two INPUT jacks.
Connect the pedal’s MONO output jack to your amplifier using a 1/4″ instrument cable. When dealing with stereo signals, use both OUTPUT jacks on the pedal.
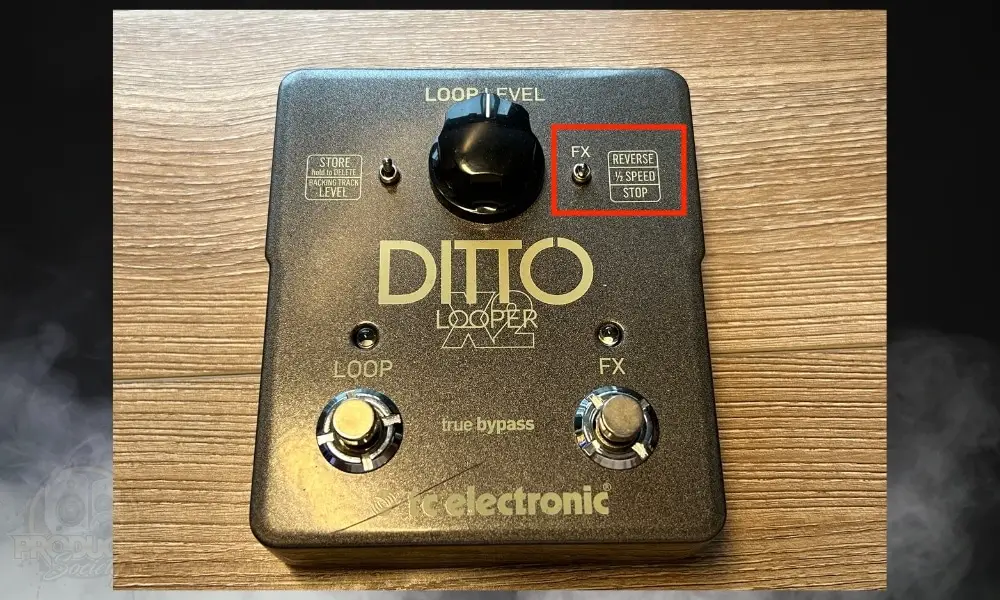
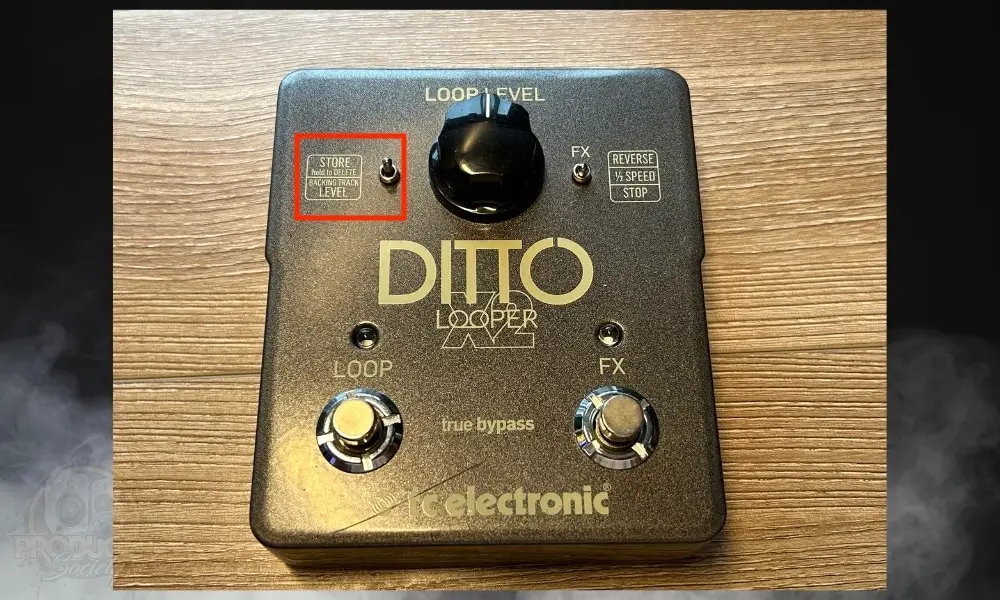
This toggle switch will control which FX the footswitch affects when you press on it.

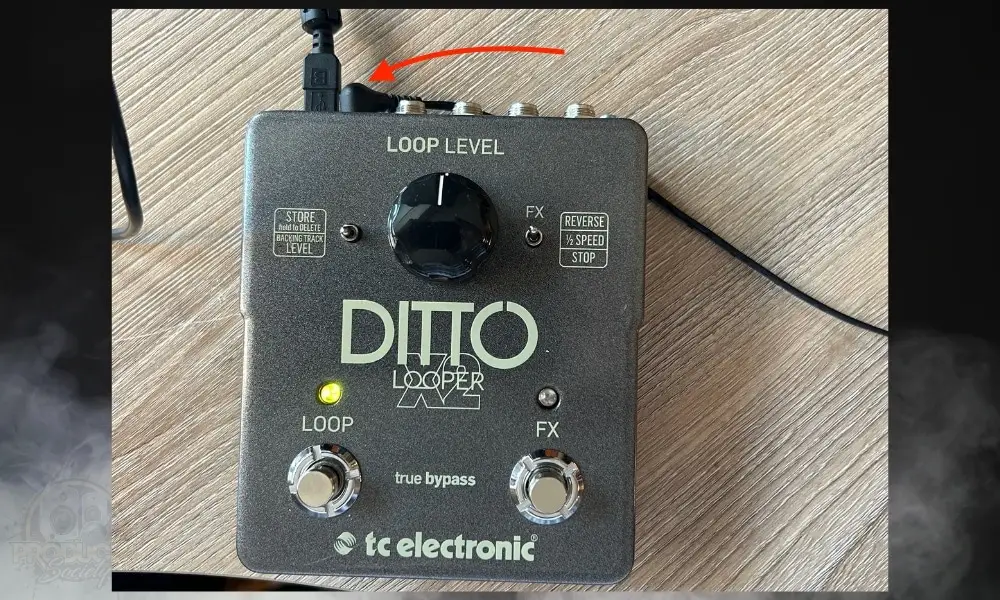
I’m no computer expert, but I don’t see micro-USB as much as I used to. If you want to find a cable because you lost yours, you can find one on my Product Page.
Now that we’ve walked through the basic functions of the pedal, let’s dive into how to actually work it. Keep in mind that you can record up to 5 minutes of loops on it and you’ll have unlimited overdubs.

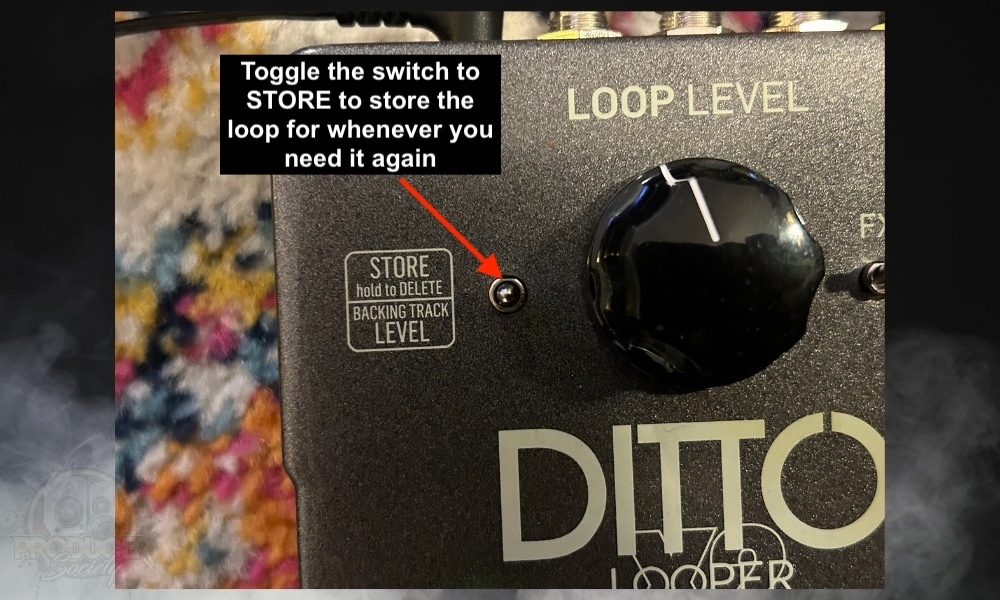
The Loop Level dial also controls the volume of your backing tracks. You’ll have to toggle that with the switch like what’s shown in the image.
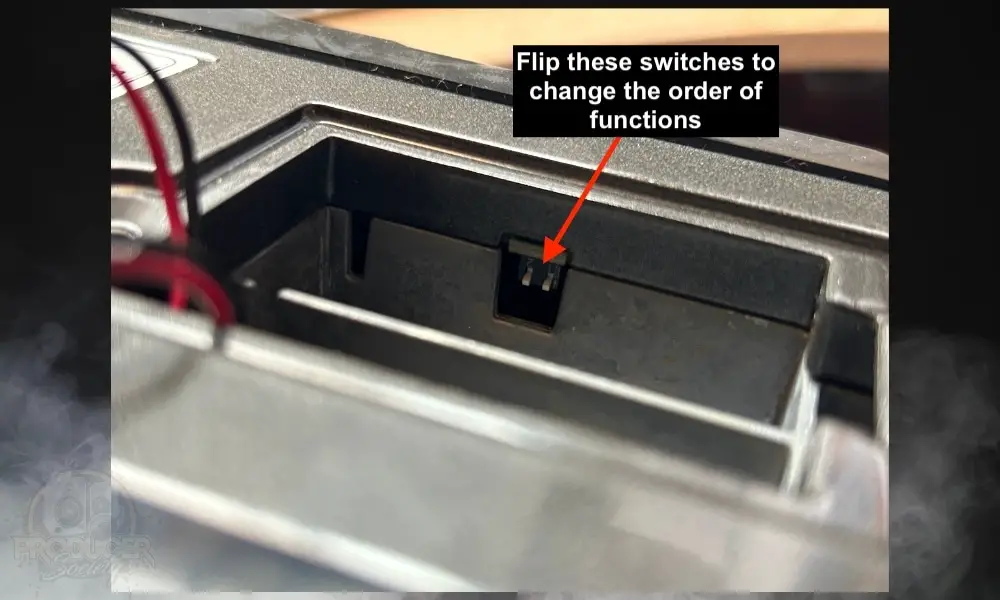
Start by removing the backplate from the pedal’s back and unscrewing the head screw to modify the Ditto X2’s default mode.
In simple terms, this means you can change it from the typical mode:
1) Record > Playback > Overdub
2) Record > Overdub > Playback
On the right side of the looper’s battery compartment, on the left when you remove the battery, are two dip switches. Set one of the dip switches with the label “2” to face downward on the Ditto X2 using a toothpick.
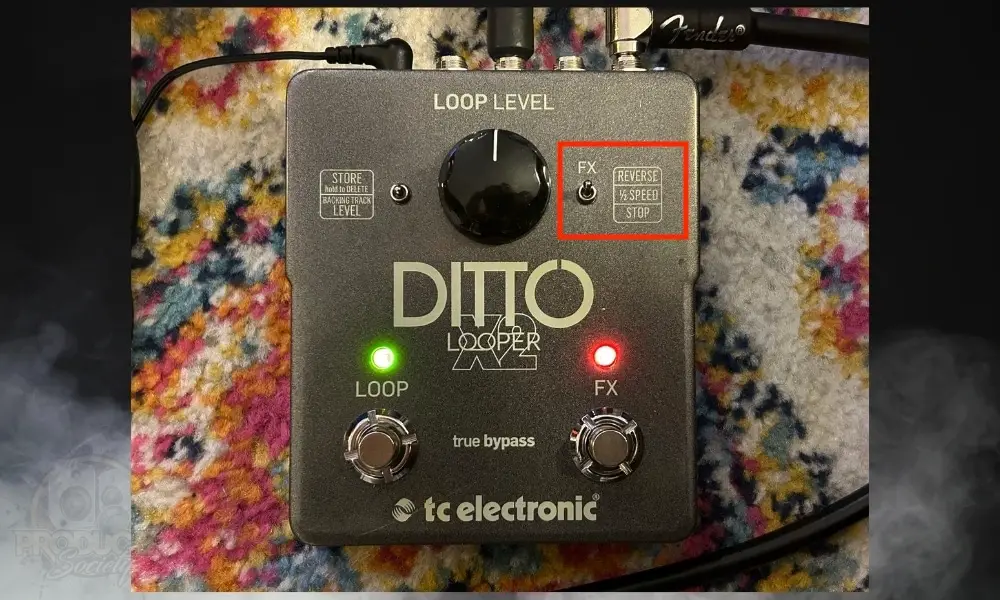
To use the looper’s reverse effect, start by setting the FX selector switch to “Reverse.” During playback, press the Ditto X2’s “FX” footswitch. After its LED turns red, it will start playing in reverse.
You can activate the half-speed effect of the Ditto X2 by switching the FX selector to “1/2 SPEED.” After that, start to play and record your desired loop, press the “FX” footswitch, and wait for its LED to turn green. The looper will playback the loop at half-speed.
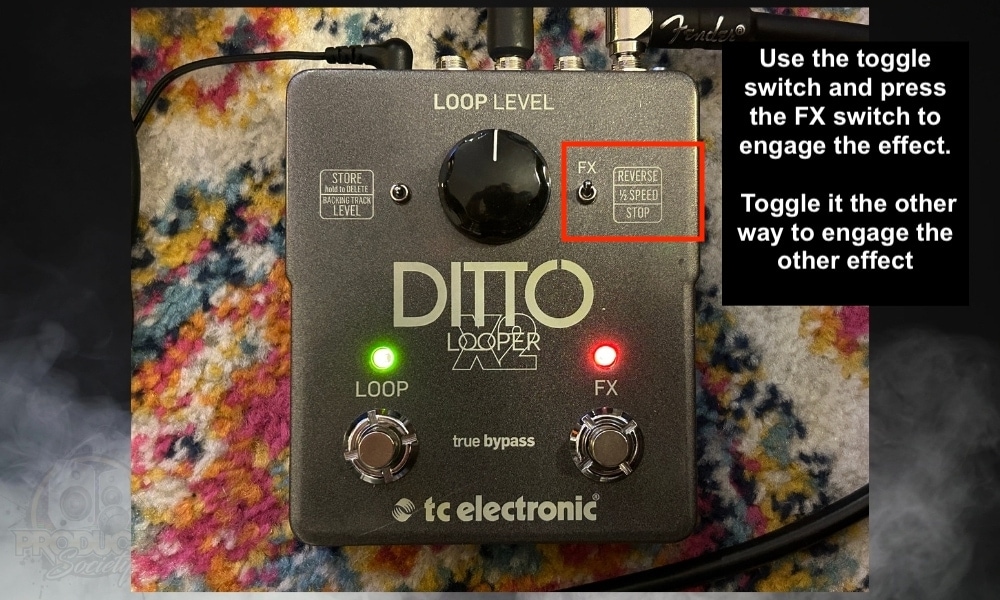
The first way to activate both FX at the same time is to set your FX selector to Reverse or Half-Speed. Press the FX footswitch, and then toggle the selector to the opposite effect and then press it the second time. This will engage both effects.
You’ll know it worked because the LED will alternate between red and green and it’ll also sound like they’re both engaged.

Press the footswitch again to disengage the FX that the FX Selector is currently toggled. Toggle it the other way and press the switch again to disengage the other effect.

The second way to activate both FX at the same time on the Ditto is to toggle the FX with the Selector and then press the FX switch. Press the FX switch quickly and twice in a row to activate the other.
The LED will alternate between red and green again. Press the footswitch another time to turn off the FX and then to disengage the other one, you’ll have to press the footswitch quickly and twice in a row.
For a more detailed tutorial, check out my guide on how to connect the Ditto X2 to your computer, including how to update the firmware and other helpful tips.
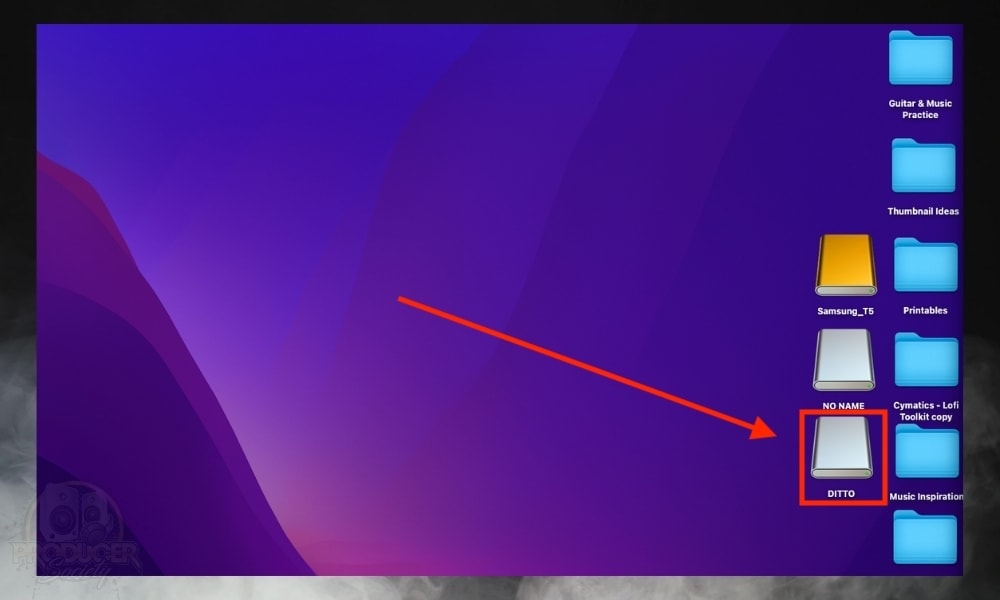
After connecting the Ditto X2 to the computer, locate the file folder with the title “DITTO,” which is an accessible external disk.

Navigate to the TRACK folder containing the Ditto X2’s loop files. Click on it to access the files in it.
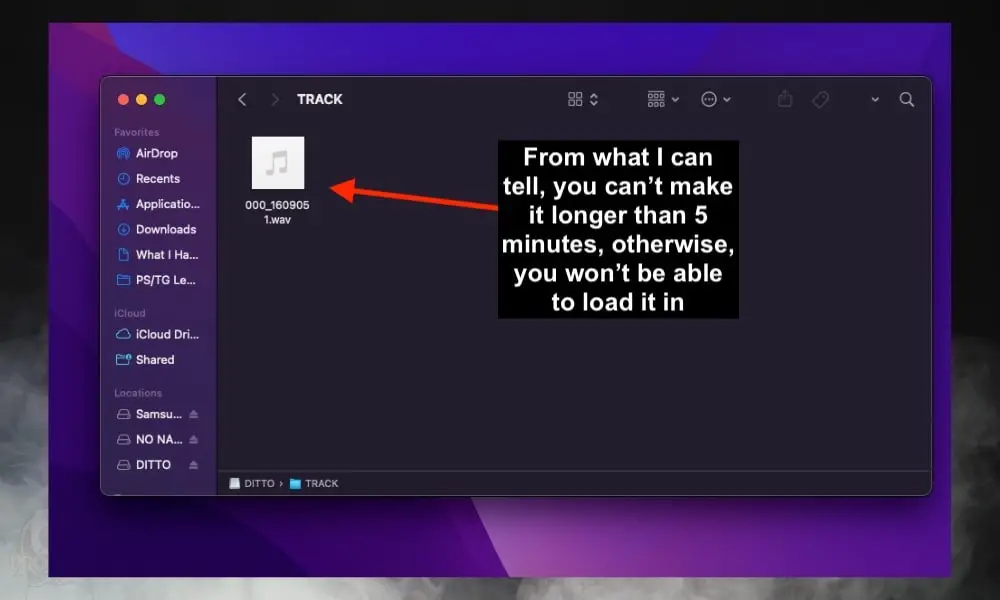
Drag and drop the loop files from your PC into the Ditto X2 folder. You can only hold one loop and backing track at a time, and it can’t be longer than five minutes.
Now that your setup is complete, you can experiment freely with creative ideas and other features. I’ve added some other miscellaneous tips for you as well.
| Footswitch LED | Meaning |
| Static Green | The loop is in playback |
| Static Red | You’re currently recording a loop |
| Blinking Green | A loop is currently stored in the memory bank but it’s not playing |
| Blinking Red | You’re erasing the loop or converting it |
| No Light | It’s powered off, disconnected, or not playing anything (maybe all 3) |
| FX LED | Meaning |
| Static Green | You’re using the half-speed effect. |
| Static Red | You’re using the reverse effect. |
| Blinking Red & Green | You’re using half-speed and reverse at the same time. |
| No Light | It’s powered off, disconnected, or not playing anything. |
![Ditto X2 on Power Bar - Where to Put The Flanger In Your Signal Chain? [ANSWERED] - 1](https://travelingguitarist.com/wp-content/uploads/2023/08/Ditto-X2-on-Power-Bar-Where-to-Put-The-Flanger-In-Your-Signal-Chain-ANSWERED.jpg)
I don’t recommend using batteries in looper pedals ever because they usually don’t last very long. I did an experiment on the RC-1 and the RC-5 which demonstrated this. A power supply is going to supply your pedal as long as you have electricity in your home.
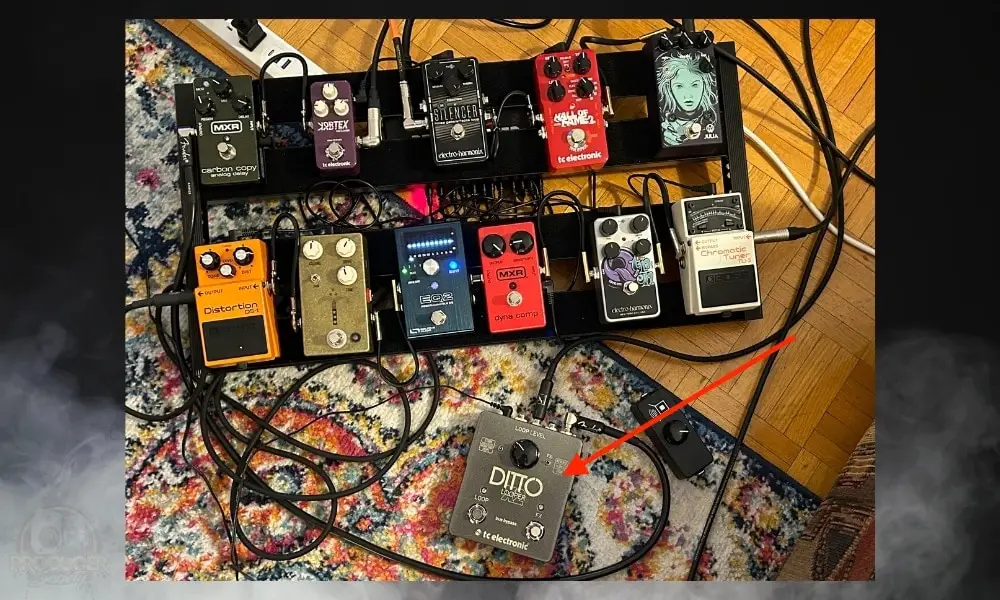
I do most of my guitar playing on my couch, so the pedal needs to be either on the bottom of the board or off it right in front of me. This is why I had to use a separate power supply. The PPP3+’s power cable was too short.
A cool trick you can use with the Ditto X2 is to record your lick or riff with the half-speed button turned on. This means that when you disengage the half-speed effect, it’ll bring it up to regular speed.
Modulation effects may be used in the FX loop to give your guitar tone character and movement. Record a loop with the modulated tone using the Ditto X2 Looper.
Experiment with turning off the modulation effects while the loop is playing to introduce moments of clarity and contrast within the recorded loop.
You can Insert a volume pedal into the FX loop to regulate the dynamics of your signal. After this, record a prolonged chord or note progression with the volume pedal in the low position, generating a subtle and ambient loop.
Increase the volume gradually with the pedal to create a swelling effect within the loop, providing dynamic tension and release to your performance.
You can use modulation effects in the FX loop to generate a textured and modulated tone. Activate the Ditto X2 Looper and record a chord progression or riff using various modulation effects.
While the loop is playing, try toggling to half-speed or reverse. Half-speed produces incredibly interesting and airy sounds that are wonderful for improvising. You can get really cool and ethereal textures with half-speed that are great to improvise over.
With reverse, you have the ability to reverse your entire chord progression, in turn reversing the functional harmony.
Say, you have a standard I-vi-ii-V or C-A-D-G chord progression loop playing in the key of C, the reversed track will now play G-D-A-C, making it into a V-ii-vi-I progression.
Playing the same phrases, or melodic ideas over these reversed chords is going to bring completely new meaning to your ideas, as the intention and mood of the background harmony have changed.
Use the Ditto X2 Looper to record a chord sequence or riff. To add harmonies or lower or higher octaves to the looped phrase, use a pitch-shifter or octave pedal after the Ditto X2 Looper.
This technique can be used to record basslines an octave or two lower than your current guitar parts.
Experiment with different settings and intervals within the chords of your song or track to add a rich harmonic accompaniment to your playing.
Soloing in the higher octaves with a pitch shifter on top of your guitar and bass loops can be an excellent way to come up with new ideas, especially during a solo practice session.
The Ditto X2 Looper can be used to record a repeated chord progression or muted strums, which add a sense of rhythmic texture and groove to your loop.
You can use an overdrive pedal on top to add some crunch, and a bit of edge to it. If you want to give the loop a dynamic and throbbing vibe, use a tremolo followed by a choppy effect pedal to provide rhythmic fluctuations and staccato bursts.
Use the Ditto X2 Looper to get a looped phrase going. Now use a wah or envelope filter pedal after the Ditto X2 Looper to introduce sweeping filter effects to the initial looped phrase.
You can start tweaking the filter parameters in real-time to shape the tonal characteristics and create expressive and evolving textures within the loop.
Engage the Ditto X2 Looper and record a basic repeated motif or ambient drone. After the Ditto X2 Looper, add different experimental effects pedals like stutter pedals, granular pedals, glitch effect pedals, or a pedal that offers ring modulation.
Manipulate the parameters of these effects in real-time to turn the looping phrase into a compelling and surreal sound collage.
Using this as a backdrop, add more overdub layers on top. One idea would be to engage the reverse or half-speed functions on one of the layers on top.
This way, you can stack up unique and interesting textures that can work very well for soundscapes, drone tracks, or even film scores.
As a great practice tool, the Ditto X2 allows you to import high-quality jam tracks from Jam Track Central that you can play with. Based on its manual, you can also access tab files of the songs to study as you play them along aside from the tracks.
Using this TCE video as your guide, register an account with Jam Track Central so you can download solo and backing tracks from guitarists like Andy James, Guthrie Govan, Zakk Wylde, and more. You can also import them into your Ditto for playback.
Aside from the downloadable tracks from Jam Track Central, you can also playback your own tracks that you have imported from your computer to the Ditto X2. This way, you can play along with the loops of your choice for practice.
Aside from its import and export features, the Ditto X2 can also be connected to your DAW of choice based on the manual. Thanks to its compatibility, this makes recording loops and tracks much easier.
The Ditto X2 is a true bypass pedal, so you’ll only get a pure and clean sound from your guitar without disturbing its tone. With this, you can add some effects to your post-processing with your DAW or just let it be.
According to the manual, you can set the Ditto X2 as your standalone pedal while getting your effects from your personal DAW. However, this can be further explored and expanded too by adding third-party plugins to your DAW’s channel strip.
For example, you can add a free Bitcrusher VST plugin or any other unique effect onto a channel strip on your DAW. These can help you widen your palette beyond the usual effects found within your pedalboard.
This is also useful if you want alternative effects options with your recorded loop, aside from the built-in effects that your DAW offers.
If you have two amplifiers, you can use the Ditto X2 Looper’s stereo output to add stereo width to your performances.
This allows you to send your looped phrases to different amps, creating a wide stereo spread or blending different tones. However, there are more than one ways to do this.
First, connect your guitar to your drive pedals. Connect the drive pedals to a chain of stereo effects pedals, in the order that you fancy. Now connect the last stereo pedal’s output to the input of the Ditto X2 Looper using a standard 1/4″ instrument cable.
Connect the stereo output of the Ditto X2 Looper to the inputs of your two amplifiers using two separate 1/4″ instrument cables.
You can now set your two amplifiers at an appropriate distance from each other to create a wide stereo spread. This is an excellent way of maximizing the full potential of your stereo pedals for stereo width.
However, since the signals are sent in stereo to both amps at the same time, there’s no way of using these two amps alternatively or individually. That’s the problem that the next setup helps solve.
Using two amps with an A/B/Y pedal opens up a world of possibilities. But before discovering the creative possibilities, let’s first set it up correctly.
First, connect your guitar to the A/B/Y pedal’s input. Connect the A/B/Y pedal’s “Y” output to the Ditto X2 Looper’s input. The Ditto X2 Looper’s stereo output can now be linked to the inputs of two different amplifiers.
Configure your amplifiers in stereo mode, with adequate space and an appropriate angle between them to generate a wide soundscape.
You can produce a stereo output by combining the two individual amplifier outputs with the A/B/Y pedal. Set the A/B/Y pedal to the “Y” position to send your guitar signal to the Ditto X2 Looper.
By pressing the footswitch, the Ditto X2 Looper enters recording mode. Now, play a chord sequence, riff, or melodic phrase on your guitar while the Ditto X2 Looper records the looped audio.
Once the loop has been recorded, set the A/B/Y pedal to “A” or “B.” By selecting the “A” setting, the looping sound is routed to a single amplifier, resulting in a mono output.
When you select the “B” position, the looping sound is routed to the opposite amplifier, resulting in a mono output.
The A/B/Y pedal’s “A+B” or “Y” option, which combines both amplifier outputs, helps you create a full stereo effect.
Now that you have everything set up, there are tons of ways in which you can use this setup to your advantage.
We have listed some of the creative things that you can do using the A/B/Y pedal, Ditto X2 Looper, and two amps:
Add modulation pedals such as a chorus, flanger, or phaser before using the Ditto X2 Looper to achieve wide stereo effects. When the music pans between the two amps, a stunning stereo modulation effect is produced.
A pitch-shifting pedal placed before the A/B/Y pedal can be used to make harmonized guitar parts. Since the signals from the amps are separate, you have signal independence.
The harmonized signal can be looped with the Ditto X2 Looper, and the A/B/Y pedal can be used to send each harmony to a separate amp, achieving a rich stereo harmonization effect.
Use the Ditto X2 Looper to record many layers of loops, each with its own effects pedal. Route each layer to one of the two amps using the A/B/Y pedal to create a rich, textured, and dynamic stereo loop composition.
Before the A/B/Y pedal, add a volume, reverb, and delay pedal to your signal chain. Loop-sustained guitar swells with the Ditto X2 Looper and uses an A/B/Y pedal to send the looped sound to both amps. This results in a lush, atmospheric stereo soundscape.
Set one amp to a clean tone and the other to a distorted tone for stereo rhythm and lead parts.
Loop a rhythm section with the clean amp, then switch to the distorted amp for soaring lead lines with the Morley A/B/Y pedal. This setup produces considerable stereo differences between rhythm and lead parts.
Before the A/B/Y pedal, set up spatial effects such as stereo tremolo, rotating speaker simulators i.e. rotary pedals, or stereo panning pedals.
Loop your guitar with the Ditto X2 Looper, then send the looped sound to both amps with the A/B/Y pedal. This setup lets you experiment with immersive, spatial effects that move and swirl between the two amps.


Andrew Siemon is the principal creator for TravelingGuitarist.com, a website entirely devoted to all things guitar. From repairs, music theory, chords, and improvisation, to recording at home. I've been doing this for 20 years and I've got another 50 in me.